Developing Microsoft Office 365 Add-Ins
Microsoft Office is a staple for many organizations around the world. People use it every day to create documents, spreadsheets and presentations and to manage their email. The applications are full of great features that make using them simple and intuitive, but I am sure there are things you can think of that you would love to be able to do directly in an office application that can’t be done now. Maybe you would like to automatically add content to an email based on content from another system. Maybe you would like to see information from your CRM system about the individual who sent you an email. Or maybe you would like to automatically add html content to an Excel, PowerPoint or Word document. All of these things can be achieved with Microsoft Office add-ins.
What are Office add-ins?
Office add-ins are in the process of being re-branded from the name “Office Apps”. As such, much of the documentation available still refers to them as apps. In concept, office add-ins are simple. They allow developers to extend the functionality of Outlook, Excel, Word, PowerPoint and Project via an API that gives the add-in access to the content of the open item (i.e. document, email, spreadsheet, etc.).
Office add-ins are written in html and javascript and are hosted on a web server. Not to be confused with the older COM-based add-ins, the only portion of these add-ins that might be considered to be installed is the file that tells the application where to find the add-in content. This approach to development allows the same code to be reused on both the web and desktop versions of the Office applications.
Office add-ins are activated (turned on) based on the context of the application. For example, add-ins may be limited to particular applications or they may be limited to particular circumstances such as only when a user is composing a new email message or only when the content matches a particular regular expression.
Office add-ins can be installed from the Office store or, when being used for purposes specific to a company or individual, they can be installed via a specific url or directly from a manifest file on the local machine.
Anatomy of an Office add-in
An Office add-in is made up of a manifest file, which is an XML file that is meant to communicate certain details about a particular add-in and any number of files (html, css, javascript, etc.) that make up the webpage that contains the add-in’s functionality. As it says in the msdn article on the subject “manifest + webpage = office add-in”. There is no reliance on any particular web development stack.
Creating an Office add-in
This section will cover a complete example add-in that was developed to help us at Mercury New Media tie our Outlook calendar appointments to specific customers and projects. This serves as a specific example of a real-world (albeit simple) application of Office add-ins. There are so many features available that it would be impossible to show them all, but this should give a good sampling of what can be done.
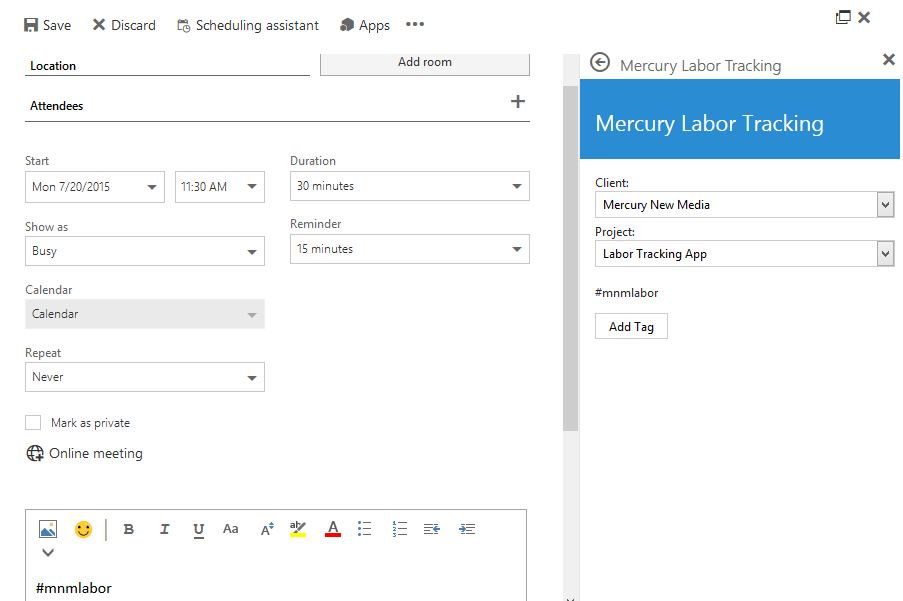
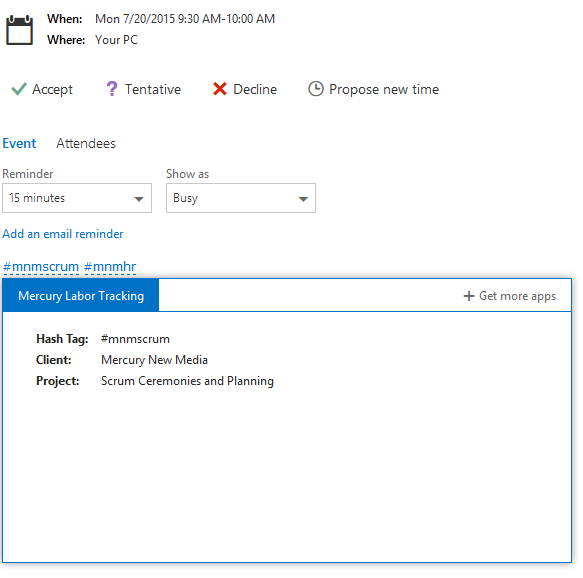
For this add-in, we will be using hashtags included in the body of an appointment to identify a calendar appointment as being related to a specific client and project. Without this add-in, we would need to either remember the hashtag related to each project we work on or we would need to go look them up each time we wanted to add a tag an appointment. This add-in makes it so we can seamlessly add a hashtag from within Outlook or view the client and project associated with an appointment that was sent to us.
The manifest file
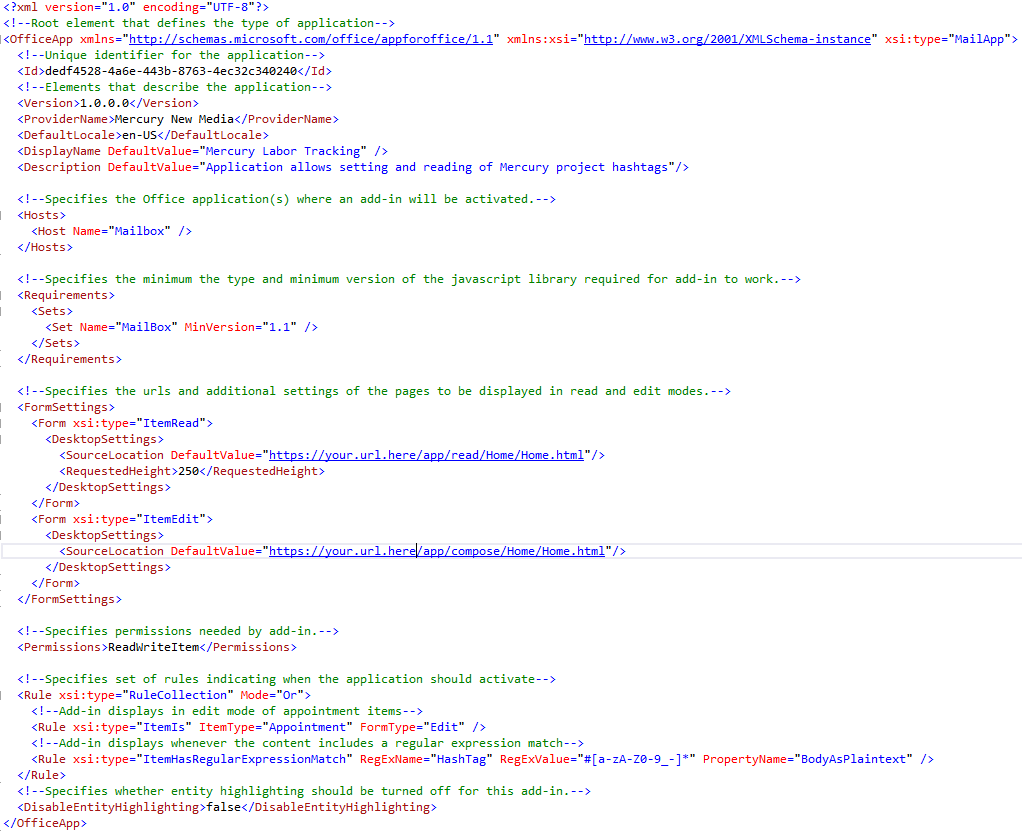
The manifest file is used to show exactly where the add-in can be found as well as when it should activate. You can see in the manifest file shown below how an add-in is defined. The most interesting parts can be found in the FormSettings and RuleCollection elements.
The FormSetting section is used to specify the starting urls for the add-in. In this example, we have two different starting urls. One is used when a calendar item is in edit mode and one is used when it is in read mode. These urls must be publicly accessible pages protected by SSL. It is possible to use single sign on between Office 365 and your application to provide seamless authentication if desired.
The RuleCollection specifies one or more rules for when your add-in should show up. For this example, we want the add-in to display if we are editing an appointment (so that we can add hashtags to that appointment) or if the appointment we are viewing has one or more hashtags included in it. The second rule makes use of a regular expression match to find all hashtags in an appointment. There are also built-in options to recognize addresses, appointment time suggestions and attachments.
HTML Files
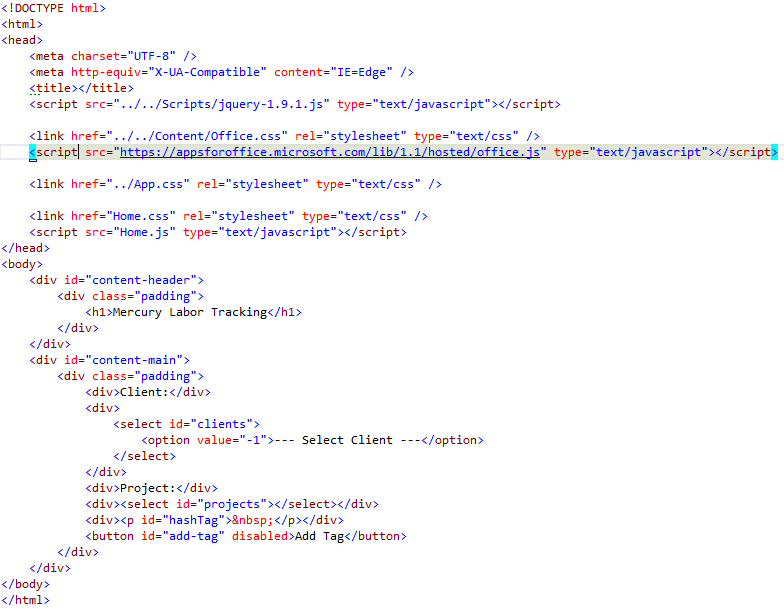
There is very little that is unique to Office applications about the HTML files for this example. The only thing worth mentioning highlighted reference to the Office Javascript api. Without this script reference, none of the Office specific functionality will work.
Javascript Files
The javascript files are where the real work happens. This is where the add-in can actually make use of the Office javascript api to interact with the Office application.
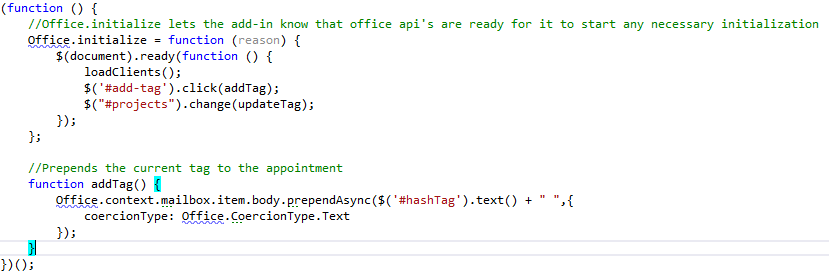
In the edit mode scenario, the main integration point is that we want to be able to write a hashtag into the appointment that we are creating. In the script snippet below, we can see exactly that. Most of it looks exactly like any other javascript file you may see, but there are two references to the Office api included.
The first is Office.initialize, which you can think of as being similar to JQuery’s $(document).ready(). It is used to insure that your add-in does not try to run it’s scripts before the Office application is ready. Anything that is supposed to run when the page loads should be inside the defined Office.initialize function. In our case, we want to load some dropdown options and bind some controls to specific actions.
The other reference to the Office api is when we click the “Add Tag” button to put the selected hashtag into the appointment being created. At this point we use the prependAsync() function to add the hashtag text directly to the body of the appointment.
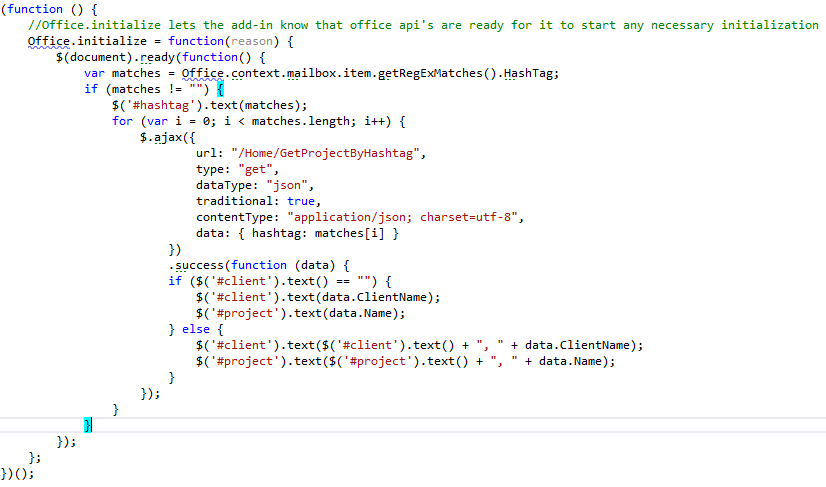
In the read mode, we want to find all hashtags that were included in the appointment we are viewing so that we can display the projects they are related to. Like the edit mode, we again include all of our setup in the Office.initialize function. The add-in is able to get the hashtags that were included in the appointment by using the getRegExMatches() function and referencing the RegExName given to the hashtag regular expression in the manifest.
Installing the add-in
Once the add-in is completed and published to a publicly available url, installing it to your Office 365 account is pretty straightforward.
- Log in to your Office 365 portal
- Click the “Settings” gear in the upper right-hand corner of the page.
- Click “Manage Apps” (there is that old terminology still hanging around)
- Click the + above the list of installed applications
- Here you can choose to install it from the Office Store, a URL or a file.
- If you are going to install from a URL or file, the link should go directly to the Manifest.xml file.
Once the add-in is installed, you will be able to see it in both the web portal version of the application and the desktop version.
Tools and Resources
- dev.office.com has a great getting started guide and detailed references for the Office Javascript API and the Manifest file schema.
- napacloudapp.com is a tool that lets you get started with an Office add-in quickly be generating a starting template.

